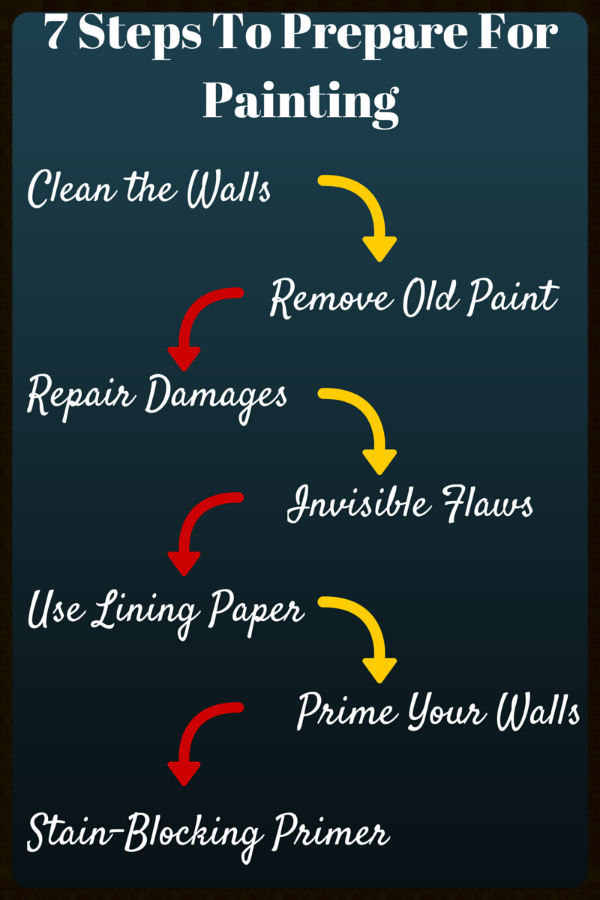
 Painting interior walls is the easiest way to bring your living space back to life. But when it comes to interior house painting, proper wall preparation is critical to achieving perfect results. To help you out, we’ve compiled a seven-step guide to preparing interior walls for painting.
- Clean the walls: To clean the walls that need to be painted, you can use a vacuum cleaner or a towel. If you intend to paint your bathroom and kitchen walls as well, a solution of laundry detergent and water might help you remove residues (e.g. rust-colored drip marks and sticky residue from cooking). After washing the walls, give them a quick rinse and allow them to dry completely. If there is wallpaper on the walls, you’ll need to remove it and then clean the walls properly. If mold is present, apply an anti-mold solution to the affected area; also, get a special sealer (e.g. anti-damp paint) to cover heavy mold growth.
- Remove old paint: To remove cracked or flaking paint, use a paint scraper and sandpaper to smooth the surface. You can staple a piece of sandpaper to a sanding block or use an electric sander, which is more appropriate for large areas.
- Repair damaged areas: Interior house painting means much more than cleaning a few walls and choosing a chic color. To get the results expected, you must find all the flaws before priming and painting your walls. Loose patches of old plaster and cracks around window and door frames are some of the most common problems you may observe when inspecting your walls. After removing the old plaster, prepare fresh plaster to repair those areas. As well, a good idea would be to fill the gaps around windows and doors with a flexible sealant.
- Find “invisible” flaws: While some flaws are visible, others are not. You can use a utility light to find the flaws that are less obvious. Hold the light close to the wall surface, moving it up and down. Circle any flaws you notice so that you can find and repair them later. After executing all the repairs, use sandpaper to smooth imperfections away.
- Use lining paper: Using lining paper implies additional work, and it usually doesn’t do much good. However, in specific situations, such as when walls have lots of fine cracks or large repair areas, covering them with lining paper can help you get a smooth, flawless base for paint.
- Prime your walls: If your walls are covered in a water-based paint, you can apply a fresh coat of paint over the old color. But if you intend to paint over a semi-gloss, gloss, or oil-based color, using a primer is imperative to end up with perfectly painted walls.
- Use a special stain-blocking primer: Although a regular primer can hide small imperfections, most products can’t cover certain marks, such as those left behind by water and permanent markers. These marks will bleed through your paint, even if you apply several coats. First, try to remove the stains; if they won’t go away, use a stain-blocking primer.
We hope that you’ve found our guide useful. To help you out even more, here are three key takeaways for your interior house painting project:
- use self-adhesive patching material to cover large cracks and holes;
- if you don’t want to prime the entire wall surface, prime the areas you spackled, or else your walls will show shiny spots after the paint is dry;
- use a good-quality tape to protect adjacent walls, light switches, and woodwork.